Propagating Monstera Adansonii: Tips And Tricks For Success
-
Chris Dosser
- January 24, 2021
If you buy something using the retail links in our articles, sometimes we earn a small affiliate commission. This does not impact the products we recommend.
Monstera adansonii is a relatively easy plant to propagate and in this article we’ll show you step-by-step how to generate yourself many, many new Monstera plants.
We’ll be testing the two easiest and cheapest ways that help cuttings develop and thrive, Monstera adansonii propagation in water, and Monstera adansonii propagation in soil, by recording and showing you how our own cuttings develop.
To have the best chance of a successful adansonii propagation that goes on to grow beautifully fenestrated leaves you’ll want to have a healthy adult plant to begin with.
If you have an adult plant that has leaves which are drooping or falling off you might want to address why this is happening using this troubleshooting guide before attempting to taking any cuttings.
Tools you will need to propagate monstera adansonii
To propagate your Monstera adansonii you’ll need are the following tools on hand:
- An extremely sharp and sterilised knife/blade
- A glass jar with filtered water or rain water
- Substrate suited to Monstera
- Rooting powder (optional)
Propagation in the world of plants refers to the process of producing more plants. Plant propagation is separated into one of two categories, either assexual or sexual. The term 'assexual' describes reproduction where plant material such as cuttings of leaves, stems or roots, bulbs and runners produce a genetic replica of the parent.
Our Favorite Monstera Plants And Supplies On Etsy
How to take a cutting from monstera adansonii
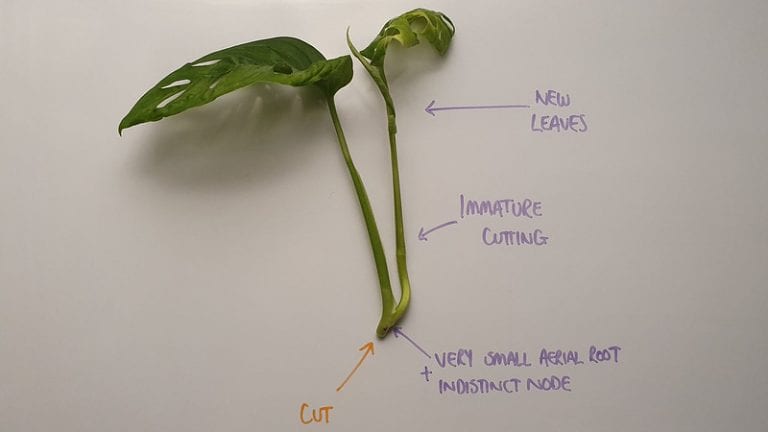
To take a Monstera adansonii cutting, first locate a mature section of the vine. That is, one which has a stem at least the thickness of at least a drinking straw. Cutting an immature section of the vine will risk a poor success rate.
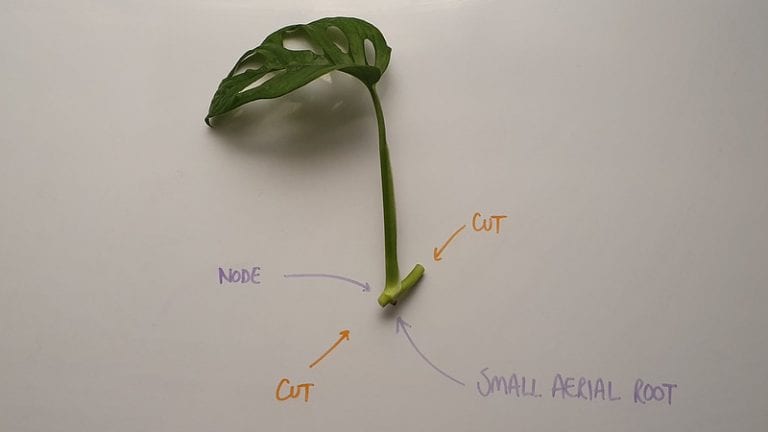
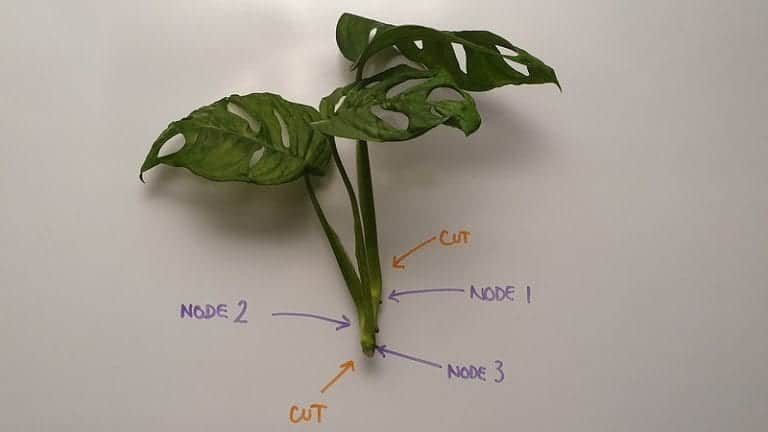
Look for a section of the plant that has a few leaves and a small brown node underneath where those leaves meet the stem.
The nodes on Monstera adansonii are swollen rings on the main stem where meristem cells can be found. They are easy to locate as this is the section of the plant where leaves and aerial roots can be found.
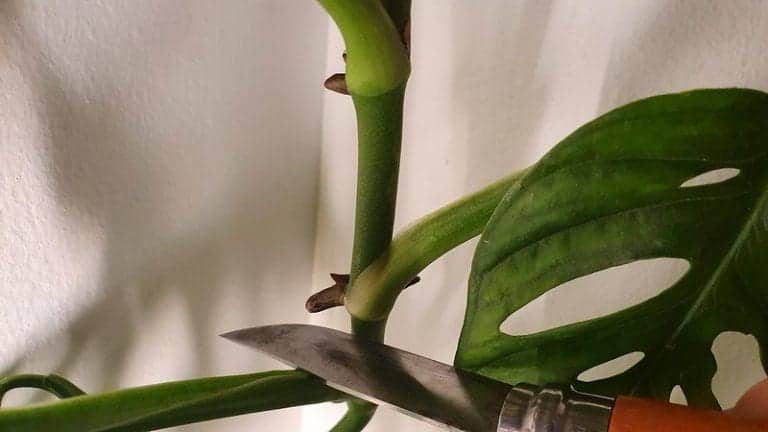
Using a sterilized knife or clippers, make a cut a little below a node. Meristem cells concentrated around the node will then be activated to regenerate tissue as a response to the plant being damaged. These are the cells that will also trigger the formation of a new root system.
Your cutting need only be an inch or two in length.
Leaves on the cutting should be minimised in number and size to allow the new plant to focus energy on root production instead of supporting foliage with little or no ability to take on board water.
Monstera adansonii propagation in water
Propagation in water is a good method for less experienced (or more curious) gardeners because it allows you to get a clear view of the root system as it begins to grow and develop.
To plant your cutting in water, simply fill a glass jar about halfway with rain water or filtered water and place them cut side down in the water. It’s as simple as that!
Adding rooting hormone solution into the water would of course help but its not essential.
You can put one clipping or a few into a single jar. Just be aware that the roots will intertwine when growing and when it comes to separating plants from one another you risk damaging them.
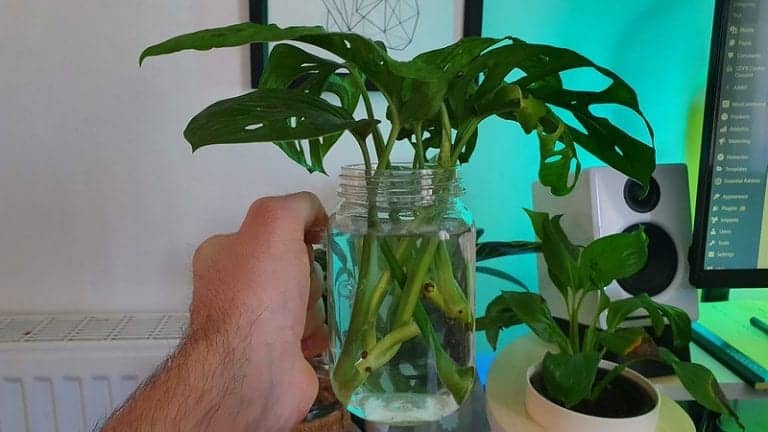
With the cut end of your clipping submerged in water, place the jar in an area that gets a moderate amount of sunlight. You want your clipping to get plenty of sun, but never exposed to direct sunlight or extreme heat.
Now you must wait for the clipping to start growing roots!
- If you notice that the water level is dropping in your jar, top it up with room-temperature filtered water.
- Change the water in your jar completely once per week to keep fungi or debris from building up and affecting your plant growth.
- Anytime that you notice a murky color or floating debris in your water, change the water completely right away!
Although you can leave your plant growing in water for months. You should notice your clipping meets this benchmark within 4-8 weeks.
To pot up your water grown Monstera clipping, put a well aerated substrate potting mix in the bottom of a clean, well-drained pot. Set your clipping in the center of the soil and add more soil around the plant until the roots are covered.
When your plant roots are completely covered with soil, thoroughly soak the potting soil from the bottom up (i.e. sit the pot in a pool of water and allow the soil to soak it up through the drainage holes). Now set the potted clipping somewhere where it will get a moderate amount of indirect sunlight.
A little note on water
You may have noticed that we always refer to filtered water when it comes to propagating or even just watering your plants. The reason we suggest this is because the level of chlorine and other additives in tap water can vary from country to country, occasionally being high enough to take a toll on your clippings.
You may also have noticed that we always refer to room-temperature water. This is just as important for your plant as filtered water as adding water that is too hot or too cold will shock your plant and interrupt the growth cycle. You may even wind up killing your clipping by accident.
Monstera adansonii propagation in soil
To plant your cutting in soil, take a clean plant pot with good drainage and add a little potting soil to the bottom. Then put your clipping in the center of the plant pot, and add more potting mix until the node on your clipping is under the soil.
Once covered with soil, saturate the soil with room-temperature filtered water and put your planted clipping somewhere that it can get moderate indirect sunlight. Your clipping will suffer like any mature plant if placed in extreme or direct sunlight, and you are unlikely to see any growth.
After potting your Monstera Adansonii clipping, root growth should develop in the first month, but to be safe, you should wait two months before assuming that your clipping has taken root. Write the planting date on a label or the calendar to keep track.
While your Monstera clipping is growing roots, be sure to keep the soil moist. The vine is naturally found in the tropics of Central and South America so can handle a little more moisture than many house plants.
Depending on the level of sunlight your clipping receives, you will need to water your Monstera once a week to once every two weeks.
Note of caution: take care when sourcing cuttings
When propagating your plants, it is important to use care both with your mother plant and your cuttings. This not only means considering feeding, watering, and sun exposure, it also means being careful not to over-strip your mother plant in an eagerness to grow too many cuttings.
To maintain a healthy mother Monstera Adansonii plant, take only a few clippings at a time. A rough rule is to take off no more than 25% of the plant mass at any one time. After collecting cuttings, make sure to give the mother plant time to recover before propagating once again.

Chris Dosser
Co-Founder of Eden Indoors
Chris is a self-taught horticulturist with over a decade of experience caring for houseplants and creating lush, thriving indoor oases. He specializes in Monstera, and by self admission has a serious problem with buying and propagating rare indoor plants!
Similar Posts
Monstera Leaves Yellowing After Repotting: Causes and Solutions
Yellowing leaves may be a sign that your Monstera is experiencing shock or stress, but is this caused by overwatering, underwatering or nutrient deficiencies?
The Benefits Of Misting Your Monstera Plant: Proper Techniques Explained
Discover the benefits of misting your Monstera including how it improves plant health, prevent pests, and creates a better overall growing environment.

